Help Content
|
OVERVIEW
|
The resumeGen is a web-based universal resume management system
that allows you to build and automatically synchronize multiple versions of your
personal resume, generate various presentation styles and download the final
result in different data formats.
|
TERMINOLOGY
|
Design - Your private space on resumeGen, where
you would be able to manage the content and variants of your resume.
Picture A: Design area.

Results - Your private space on resumeGen, where
you can generate and download all possible versions of your resume.
Picture B: Results space.

Style - Presentation shape of the document. resumeGen
has a predefined set of the presentation styles. You can choose any of these to generate your result resume.
Resume Tree - Your resume content structured as a document tree.
The tree has a limited number of tree node types.
There are two groups of nodes:
- Specific-purpose nodes: "resume", "objective", "experience", "experience-item", etc
- General-purpose nodes: "block", "text", "list", "list-item" and etc.
Every node could (optionally, depending on its nature) have:
- Node content - This is plain text and consists of node specific data. For example: node "text" consists of content with textual content (can be used everywhere), node "name" consists of your name as its content (can only be used in "title" area of your resume, being the name of the resume owner).
- Node properties - This is an unlimited number of "name-value" pairs, which are appropriated to the current tree node type. For example: the node "phone" has only one property - "phone-type" (can be "home", "cell" or "work").
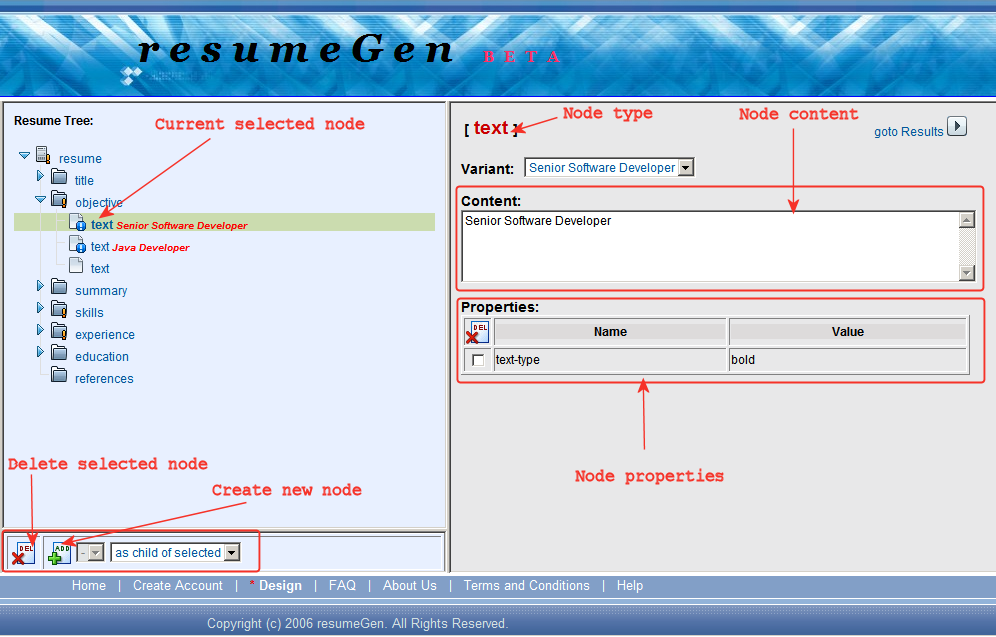
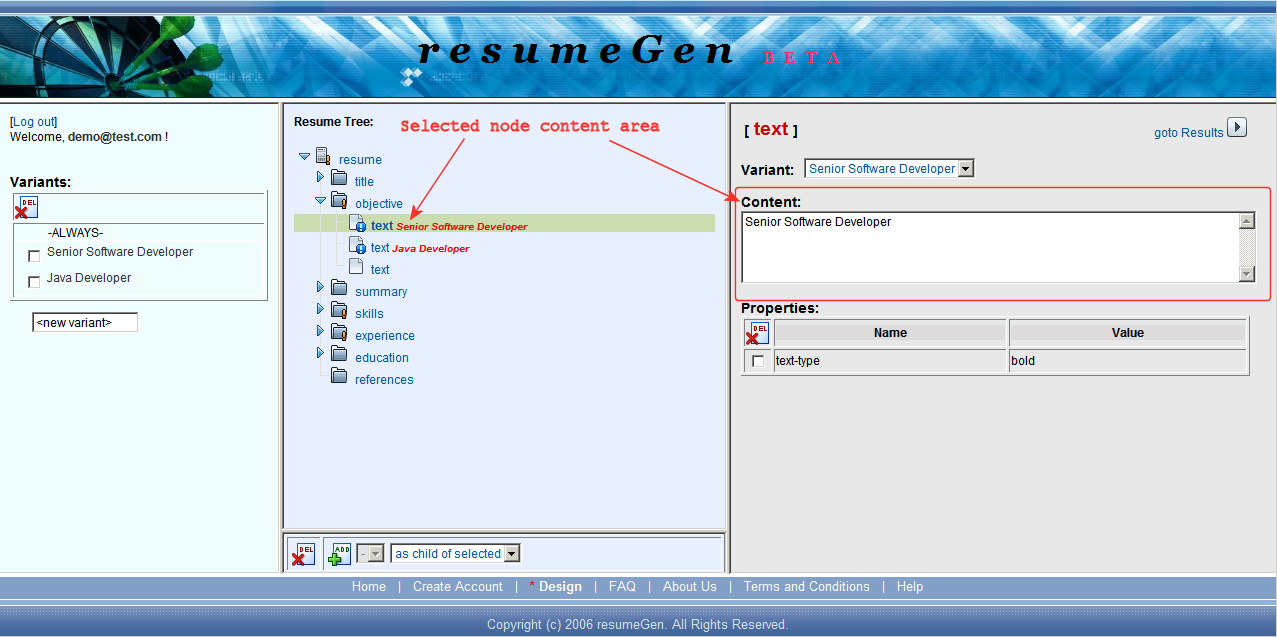
Picture C: Resume Tree elements and their management.
Variant - A unique label, which could be used to mark any part
(big or small) of your resume content tree. The unmarked part of the document belongs
to any document version and is the same as if it were marked "ALWAYS".
Version - A result of your resume generation. The version
of the resume will be generated based on the selection of variants
labels, which will be appropriate for and should be included in the particular
resume version. Example: For resume version
"J2EE senior developer", the following variants could be appropriated:
"J2EE", "Java", "architect", etc.
|
GETTING STARTED
|
Getting started with resumeGen is easy.
First, you must register.
Second, you must log in to the membership area. The membership working area provides
facilities to design your own resume and/or generate result versions(s).
|
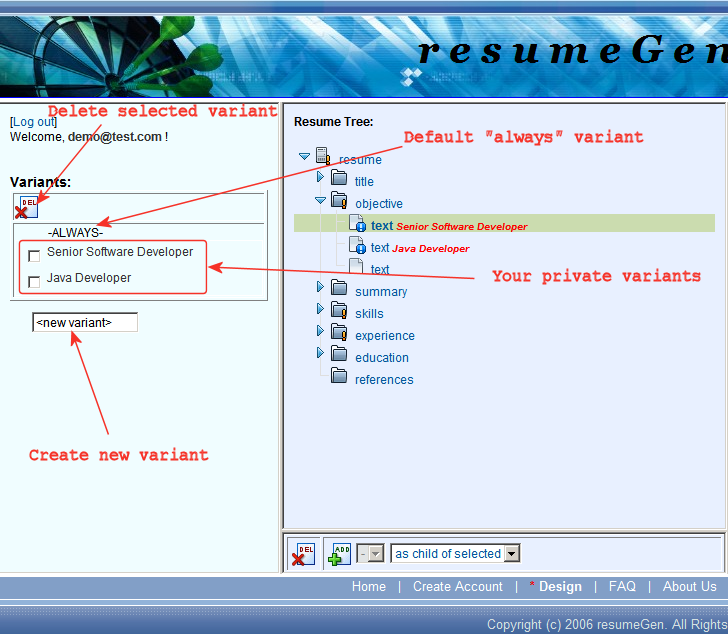
VARIANT MANAGEMENT
|
The left frame of the Design area is a management panel for your
variants. You can delete existing variant(s)
or create new ones.
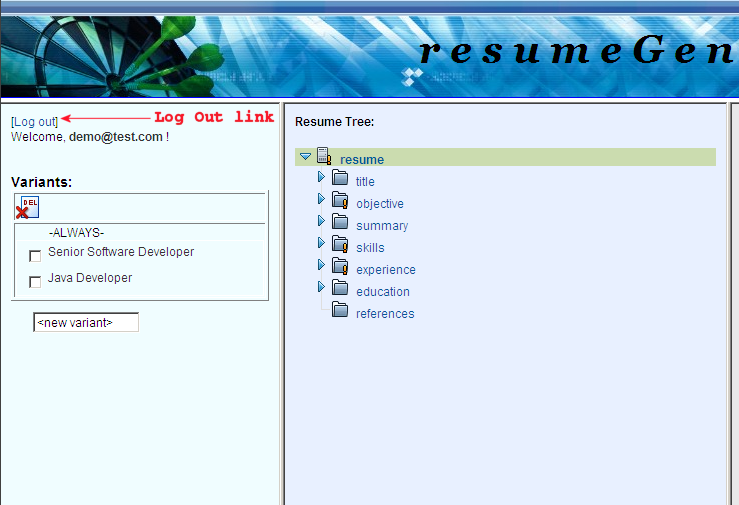
Picture D: variant management frame.
|
CONTENT MANAGEMENT
|
Use the resume management facilities from your Design area
(see picture C. above) to manage the core content of your resume. The central panel
of the Design allows you to control your resume tree structure
by creating and remove appropriate tree nodes. The right frame
presents the value of a current selected node: node content
(if existing and allowed for this type of node) and/or
node properties (if existing and/or allowed for this type of
node). So, in the right frame of the Design
you have the tools to make corrections or changes for the currently selected
node.
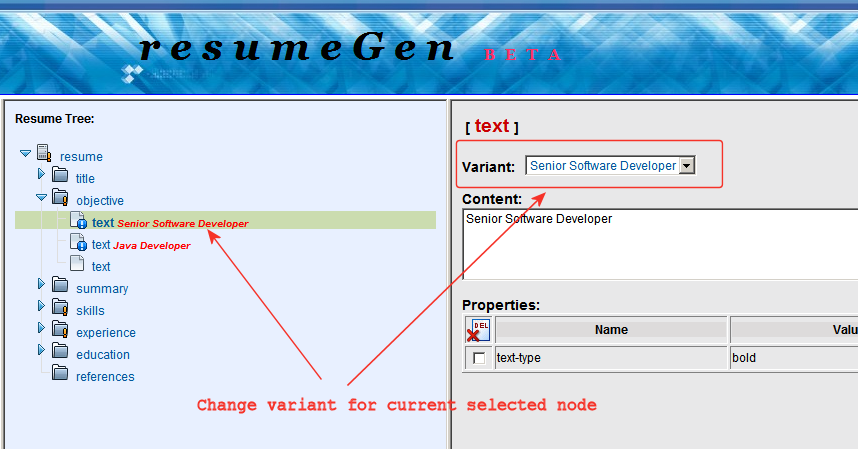
The right frame also allows you to change the variant for the
currently selected node. The default value is "always"
(which means this part of the resume tree will be presented on all possible
versions). In case you want to be more specific and relate
the current node to a selected variant only,
go to "Variant:" drop-down menu and change the default
("always") to some other available variant. Note: this
variant should already be found in the Variant Management
frame (see above).
Picture E: change variant for current selected node.
|
RESUME VERSION GENERATION
|
This is the final stage of the process. You already defined all possible
variants labels, created a document tree structure, provided
appropriate content for every tree node and mark
appropriated tree nodes with some of your variants.
Therefore, it is time to benefit from your hard work!
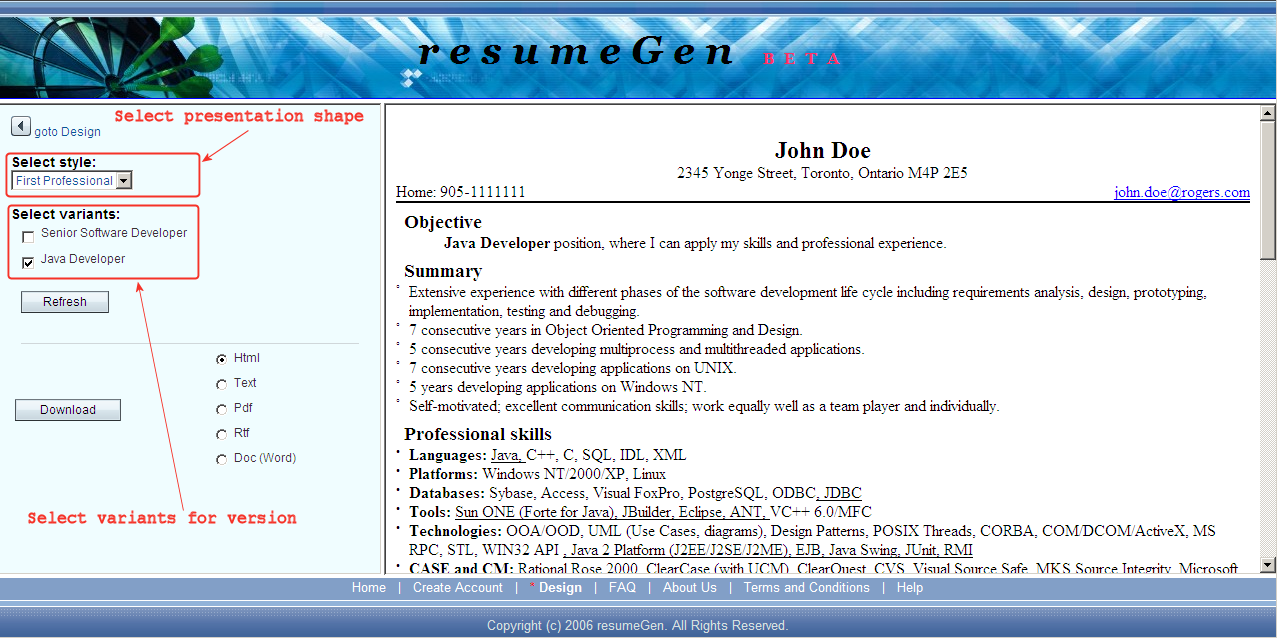
Picture F: "results" area
This will be easy. Go to "Results" page. The left panel presents
all options, which will control the generated version
result of your resume:
- Select presentation style
- Select variant(s), which will be suitable for your current version target
- Click on the "refresh" button and check the generated result in the right Preview panel
- In case you are not satisfied with the generated result, make the necessary re-selection(s) in result control options or go back to the "Design" area and continue to work under the resume tree and/or the variants list.
- If you are happy with what you see in Preview panel, save the result file on your local machine: select the file format and click on the "Download" button.
|
How to...
|
|
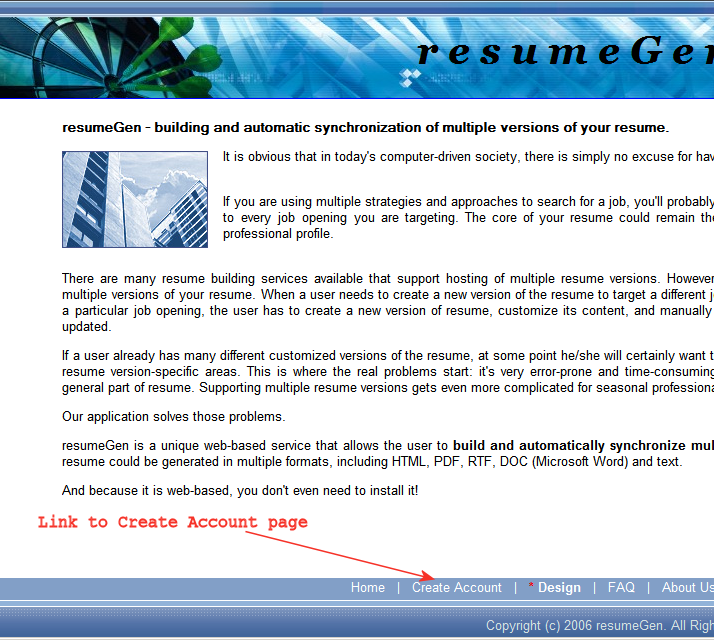
How To... Register
|
Go to "Create Account",
enter your e-mail address and password, confirm your password, review our terms of service and check the box marked "I agree". Click on the "Create account" button and you'll be registered. Your e-mail address will only be used to contact you in exceptional cases. For example, in case you forget your password, you will be able to request it and we will e-mail it to you.
|
How To... Login
|
Follow the "Design" link and you'll be asked to authenticate yourself. Provide your user ID (e-mail address) and password. Click the "Log in" button and you will enter your private design area.

|
How To... Logout
|
To logout from the system, go to the "Design" page and follow the "log out" link on the top of the left frame.
|
How To... Create a variant of your resume
|
Go to the left frame of the "Design", it's "variant management" area. Find a text input field with "<new variant>" as its default text. Replace this text with the name of your new variant. Submit the page by clicking the "Enter" key on your keyboard. The new variant will be immediately presented in a variants list above the input text area.
|
How To... Delete a variant of your resume
|
Go to the left frame of the "Design", it's "variant management" area. Mark the check boxes in front of the variants which you intend to delete. Then click on the red "delete" button. Confirm your intention to delete selected variants on the pop-up confirmation window ("Are you sure...?") by clicking the button marked "yes".
Note: The "ALWAYS" variant is pre-defined and cannot be deleted.
|
How To... Create Node
|
Go to the central frame of the "Design" page - "resume tree structure management". The frame is divided into a top part and a bottom part. The top part contains your resume tree. The bottom part is a control area, which provides you with facilities to edit your resume tree.
First, select the appropriate reference location on the tree. You have three options to create a new node, which are related to your current selected node:
- "as child of selected" - the new created node will be created as the last child of the currently selected one;
- "before selected" - the new created node will be inserted as a sibling before the currently selected one;
- "after selected" - the new created node will be added as a sibling after the currently selected one.
You can see these three options in right drop-down menu in bottom tree control area.
Second, go to the control area options and choose the option, where you're going to place your new node, relatively to current selection.
Based on your selections, the middle drop-down menu will present the nodes which are allowed to be created here. Choose which node type you would like to create and click on the green "add" button on the left of the "node name" drop-down menu. The new node will be generated immediately.

|
How To... Delete a Node
|
Go to the central frame of the "Design" page - "resume tree structure management". The frame is divided into a top part and a bottom part. The top part contains your resume tree. The bottom part is a control area, which provides you with facilities to edit your resume tree.
First, select the node on your resume tree which you intend to delete. Note: if this node has children, all of them will be deleted as well.
Finally, go to the bottom tree control area and click the red "delete" button on the left. Confirm your intention to delete selected variants on a pop-up confirmation window ("Are you sure...?") by clicking the "yes" button. The selected node (tree branch) will be deleted immediately.
Note: The "delete" button is visible only when a selected node from the tree is allowed to be deleted. For example, you cannot delete the "root" node.
|
How To... Assign a variant to a node
|
Go to the right frame of the "Design" page - "node content management". The area presents all information related to the currently selected node. Go to the line titled "Variant:" and the drop-down menu beside it. The drop-down menu will show the currently assigned variant (by default it will be pre-defined as "ALWAYS"). All created variants from the left frame ("variant management area") would be available for selection. Choose a variant which would be appropriate for the selected node and/or tree branch.
Note: some nodes are not allowed to be assigned to user-defined variants, like "root". For such nodes, the variant assignment drop-down menu would not be presented in the node control frame.
|
How To... Change Node Content
|
Go to the right frame of the "Design" page - "node content management". The area presents all information related to the currently selected node.
Go to the text input area titled "Content:". Make appropriate changes in the area. After you leave the text area your changes will be saved automatically.
Note: Some nodes are allowed to have content text (like "list", "experience", etc.). For such nodes, a content input text area wouldn't be presented in the node control frame.
|
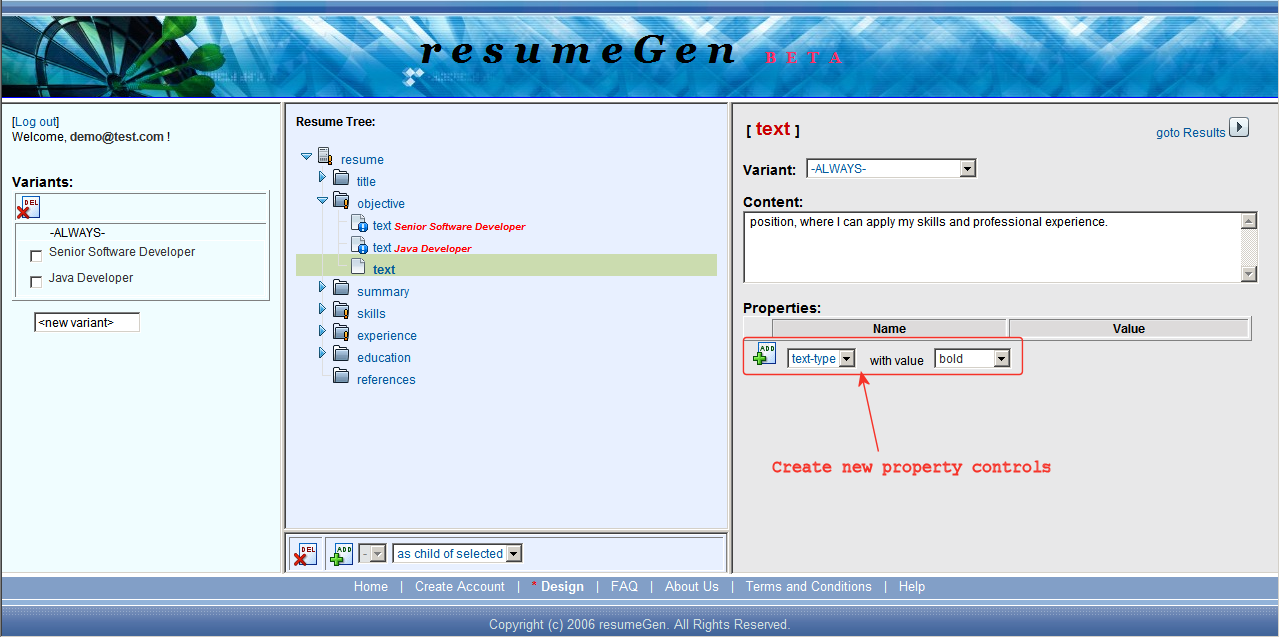
How To... Add node property
|
Go to the right frame of the "Design" page - "node content management". The area presents all information regarding the currently selected node.
Go to the node properties grid area titled "Properties:". On the bottom of the grid table you will find two selection areas. First, a left drop-down menu consists of a list of all allowed properties for the currently selected node (remember, one single property can't be created twice-as soon as you create a property it wouldn't be available in this drop-down list for this node anymore until it is be deleted). Select the property that you want to create. Then, go to the second selection area, to the right of property selection, which is property value input. Depending on the kind of property, the input area could be a) drop-down menu with allowed values to be selected or b) input text area to type a plain text value. Select or type the appropriate value for your property. Finally, submit your selection by clicking the green "add" button to the left of the property selection drop-down menu.
Note 1: in case you not allowed to create a property(s) for the currently selected node, the above mentioned node add controls wouldn't be presented on the frame. You could not be allowed to create it for one of two reasons: a) the node is not allowed any property or b) all allowed properties for the node have already been created - you may need to delete it first.
Note 2: The current version doesn't have the option to edit existing properties. As a work-around you can delete these properties and re-create them as necessary.
|
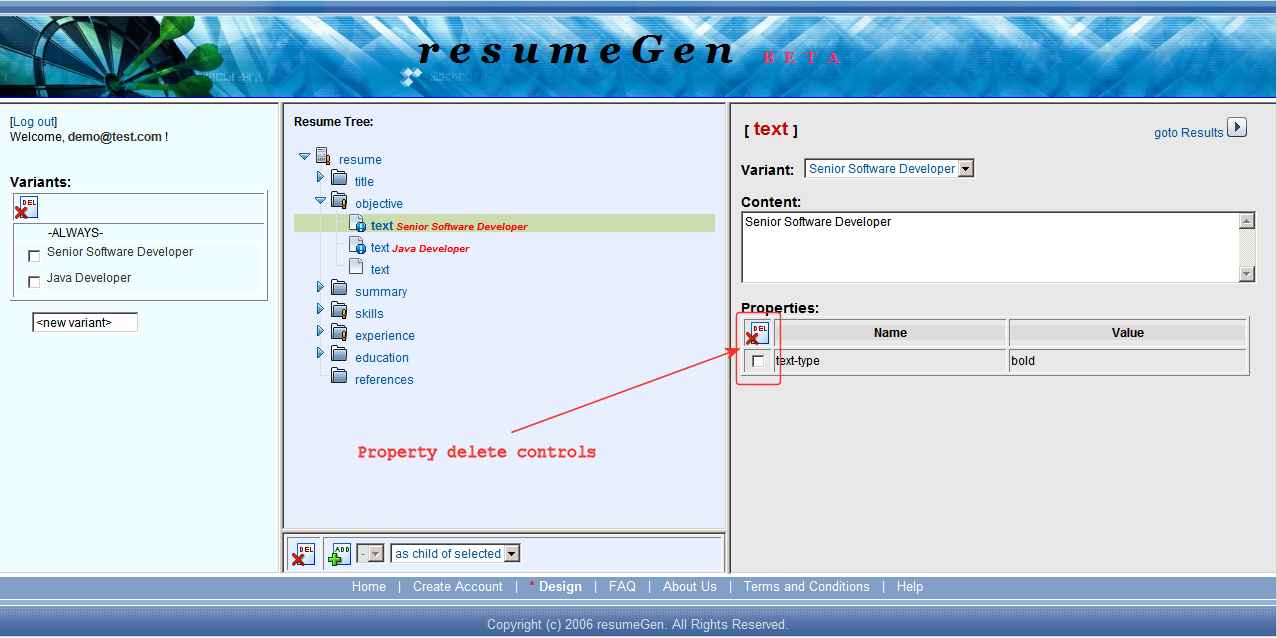
How To... Delete a node property
|
Go to the right frame of the "Design" page - "node content management". The area presents all information regarding the currently selected node.
Go to the node properties grid area titled "Properties:". Mark the check-boxes to the left of every property that you want to delete. Click on the red "delete" button, found on the top of the grid table. Confirm your intention to delete selected variants on the pop-up confirmation window ("Are you sure...?") by clicking the "yes" button.
Note: The red "delete" button would not be available for an empty grid table as there are no created properties for selected node.
|
How To... Define a version
|
Go to the "Results" page - from the right frame of the "Design" page, click the "goto Results" link. The left frame of the page is a control area that allows you to generate appropriate versions of your resume. The right frame is a preview area of your resume version, based on current control selections.
First of all, you need to select presentation style. On the version control frame choose an appropriate style on the drop-down menu titled "Select Style:". The preview area will be updated automatically. You can also manually refresh the preview frame by clicking the "Refresh" button.
To define your resume version, mark check boxes in front of the appropriate variants. Click the refresh button and review a generated version in the preview frame.
|
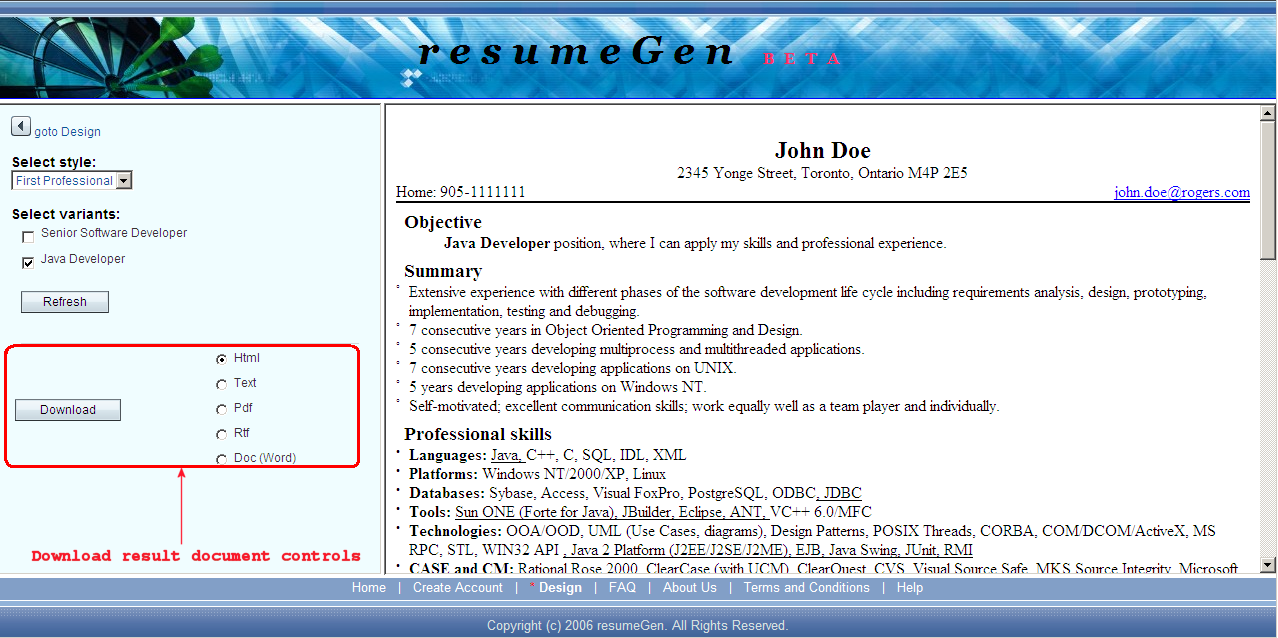
How To... Download a version
|
Go to the "Results" page - from the right frame of the "Design" page, click the "goto Results" link. The left frame of the page is a control area that allows you to generate appropriate versions of your resume. The right frame is a preview area of your resume version, based on current control selections.
As soon as you are satisfied with the resume version presented in the preview frame, you can download the result document. Select the document format that will be appropriate for your current needs and click the "Download" button. Then, a standard download pop-up window will be opened. Choose a location and file name and, optionally, open it right away to review the result.
|
Conclusion
|
That's it. We hope you'll enjoy working with our tools and, more importantly,
from favourable results. Good luck!